
I decided to write this having recently rehabilitated an ankle syndesmosis injury so I wanted to look into this area a bit more. The aim of this blog is to look at what the syndesmosis is, how it is injured, what tools we have to diagnose the ‘high ankle sprain’, and how I undertook a recent rehabilitation of this injury.
Introduction
The ATFL is the most commonly injured ligament in the ankle, and an injury to the syndesmosis can account for around 10% of all ankle injuries, as reported by Boytim et al (1991) who studied professional (American) football players in a six year study and found syndesmostic sprains accounted for 18 out of 98 ankle injuries reported. Hermans et al (2010) estimated that between 1-11% of all ankle injuries involved the syndesmosis.
Anatomy
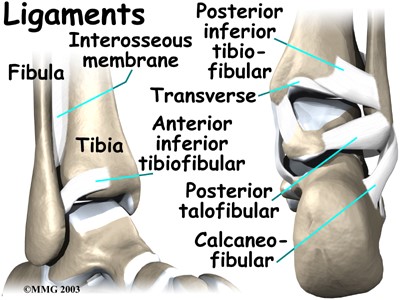
The distal tibiofibula joint is an articulation of the convex surface of the fibula, and the concave tibia (Norkus and Floyd, 2001). It is stabilised by the syndesmosis which contains the interosseus membrane which runs all the way between the tibia and fibula, and three other ligaments which provide stability at the distal end of the joint. The ligaments are the anteroinferior tibiofibula ligament, the posteroinferior tibiofibula ligament, a transverse ligament, and the previously mentioned interosseous membrane (Williams and Allen, 2010).
morphopedics.wikidot.com
Ogilvie-Harris et al (1994) completed a cadaver study investigating the amount of stability provided by these ligaments at the distal tibiofibula joint. They demonstrated that the AITFL accounts for 35% of the joints stability, the interosseus membrane 22% whilst the PITFL provides around 42%. Therefore we can see that an injury to one or more of these ligaments can cause a significant amount of instability within the joint.
Mechanism
An injury to the tibiofibula joint can be caused by contact or non contact. This could be in a tackle where a player’s foot is in contact with the ground and forcibly externally rotated, or when a player suddenly changes direction with the foot planted and moving into external rotation.
It has been shown that dorsiflexion and external rotation causes increased tension to the ligaments at the distal tibiofibula joint. This mechanism causes the talus to rotate and as a result can cause separation between the tibia and fibula stressing the ligaments, or worst case scenario, causing a rupture (Norkus and Floyd, 2001)
The external rotation mechanism has been shown to initially affect the AITFL; further rotation would then pose a risk to the interosseus membrane and PITFL (Hermans et al, 2010; Hunt, 2013). The normal gap between the tibia and fibula is around 5mm (Hunt, 2013); but even an extra 1mm increase in joint space can cause instability in the ankle.
Diagnosis
Following a suspected syndesmosis injury, it is important to gather appropriate information from the subjective assessment such as: mechanism, swelling, location of pain etc.
Objectively a suspected syndesmosis injury may have pain and swelling over the distal tibiofibula joint, reduced range of movement and strength, difficultly weight bearing (or inability to be able to push off). It is important to consider other structures in the ankle such as the deltoid ligament, which has been shown to be injured in conjunction with the syndesmosis complex, due to its accessory role in stabilisation of the distal tibiofibula joint (Hunt, 2013).
The common test I use to test for a syndesmosis injury is the external rotation test. This can be done in sitting or (if the player can weight bear) in standing (replicating the mechanism of injury). In sitting the player is sat over the edge of the bed, the knee is stablised and the foot moved into dorsiflexion and eversion. Pain would point towards a suspected syndesmosis sprain (Williams and Allen, 2010).
In a systematic review, Schwieterman et al (2013) looked at the diagnostic accuracy of special tests at the foot and ankle, their results (which didn’t include Pakarinen, I have just added it to the table) are below:
| Test | Sensitivity | Specificity | Paper | Subjects |
| Cotton Test | 0.25 | N/A | Beumer et al | 28 |
| 0.25 | 0.98 | Pakarinen | 288 | |
| External Rotation | 0.99 | N/A | Beumer et al | 294 |
| 0.20 | 0.85 | De Cesar et al | 56 | |
| 0.58 | 0.90 | Pakarinen | 288 | |
| Fibula Translation | 0.75 | 0.88 | Beumer et al | 322 |
| Squeeze Test | 0.30 | 0.94 | De Cesar et al | 56 |
The squeeze test involves the therapist compressing the middle lower leg; any pain in the syndesmosis region is considered a positive test for a syndesmosis injury. I have never used this test for a syndesmosis injury, some clinicians I have worked with do use it, and others do not. I prefer the external rotation test which is enough for me to suspect a syndesmosis injury.
The fibula translation test has been found to have the highest sensitivity and specificity but I have never come across this in practice and I am unaware of anyone else who uses this.
Finally once the syndesmosis is suspected, the injured party should be referred on for an MRI Scan to confirm the diagnosis. This method has a 96% accuracy of predicting injury to the syndesmosis compared to 63% when sent for an x-ray (Takao et al, 2003; Oae et al, 2003). A stress x ray may also show a syndesmosis injury, although Parakinen suggested that the poor sensitivity found will limit its effectiveness despite having a high specificity.
Surgery or Conservative?
One of the main factors in deciding whether to operate or manage conservatively will be the amount of instability present and the severity of the structures injured following a syndesmosis injury.
Conservative management typically will take six to eight weeks for the injury to heal, however there is a possibility that the injury will not have recovered sufficiently leaving patients with a degree of instability and a chance of reinjury. This would leave
the player/patient likely to be needing surgery in the future. Instability was found by Hermans et al (2010) in 40% of all ankle sprains with patients reporting symptoms of instability six months later. This shows the importance of resolving the instability to limit complications later on which could have a significant impact on function.
Currently the surgical technique for syndesmosis injuries involves tightrope fixation to help stabilise the joint, and depending on recovery it can take around ten to twelve weeks for a player to return to training.
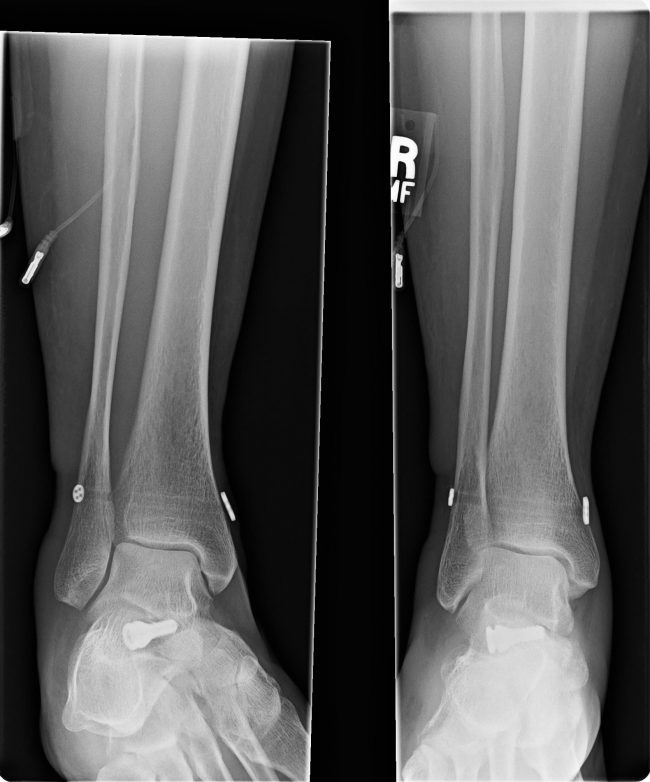
The Tightrope
The tightrope fixation is aimed at stabilisating the syndesmosis to reduce the instability at the distal tibiofibula joint. This is completed by threading a wire through the tibia and fibula and is then held in place by two suture buttons. The benefit of this procedure is that it reduces the need for any further surgery where screws were previously needed to be removed following an internal fixation; screws are still used but only if there is evidence of a fracture in the area. As always there is an element of complication, this can include a numb patch over and around the operation site, soft tissue irritation where the tightrope buttons are placed, or in more severe and rare cases as highlighted by Storey et al (2012) osteomyelitis over the implant.
http://si-instability.com/surgery-rt-leg-proximal-distal-tib-fib-joint-syndesmosis-arthrex-
Rehabilitation
Following surgery the general guidance is for six weeks healing time before beginning the main rehabilitation process. For the first two weeks the player is immobilised non weight bearing in a backslab, then moved into an aircast boot for the remaining four weeks during which time they can begin partial weight bearing as tolerated with the aim of being full weight bearing by the end of the six weeks. Particular notice should be paid towards avoiding dorsiflexion and eversion during this time to reduce the risk of applying unnecessary tension to the joint and tightrope.
Being immobilised for a prolonged period of time is likely to lead to ankle joint stiffness, muscle shortening (particularly the gastroc-soleus complex) and a loss of muscle bulk in the upper and lower leg.
0-6 weeks
The player was given exercises for his glutes and core, all of which was completed non weight bearing. Glute work consisted of long and short lever exercises whilst the core incorporated exercises such as dead bugs and supermans. Further to this, the strength and conditioning coach provided a programme so that the player could work on his upper body strength.
To increase muscle bulks I used an electrical stimulating device called Compex. This device stimulates the muscles and causes them to contract which the player has to resist against. It is not the most comfortable piece of equipment to use (which I can confirm after being a guinea pig). Until the player was able to do leg weights then the compex is their friend, completing an alternating pattern of quadriceps/hamstrings. The player started off on a small compex session of 32 reps (effectively 4 sets of 8 reps) and then built up from there.
Six weeks +
Once the six weeks was over then we began to step up the rehabilitation. This meant we could start to incorporate leg weights (once swelling was controlled) and begin ankle specific exercises which included calf raises, ankle theraband work and proprioception drills
Another program on the compex device was called ankle twist prevention (not a fan of the word prevention, I believe reduction is a more appropriate word) helped build up the strength of the peroneals to further help with the stability around the ankle.
Having been immobilised for six weeks there was a considerable amount of ankle stiffness contributed by tight muscles and stiff joints. To help reduce this we worked on mobilising the ankle as well as trying to increase muscle length. I found the talocrural and distal tibia-fibula joints very stiff so some time was spent working to alleviate this. To help increase the player’s movement we also used a continuous passive motion (CPM) machine working on plantarflexion, dorsiflexion, inversion and eversion which the player completed daily up until full range of movement (ROM) had been restored.
Mobilising the joints around the ankle including the talocrural, subtalar, superior and distal tibiofbula joints helped alleviate some of the ankle stiffness. Stretches including proprioceptive neuromuscular facilitation (PNF) helped reduce tone in the muscles. Obtaining dorsiflexion was one of the key outcomes to achieve which would help reduce the risk of further complications such as posterior ankle impingement.
We utilised a different number of surfaces to work on the player’s proprioception:
A stable surface such as grass/artificial grass/hard floor to incorporate tandem walking, heel toe walks, different ball drills such as volleys, two touch and headers. Other surfaces included foldable mats stacked up on top of one another to create an unstable environment, an airtrak mat, bosu and foam cushion, and semi circular rolls. Due to the reduced proprioceptive awareness we started off by allowing the player to focus on where they were walking during the activity. To make this more difficult for the player, a ball was placed under their chin so that the player was unable to look at where their foot was being placed, in essence making it harder to balance.
When balance, strength and ROM had improved, the player began work on landing techniques, this started off with basic two legged landing, two leg to one leg, one leg to two leg, over hurdles, forwards and backwards. Once the player developed confidence in their ability it was made a bit more football specific for example, going up for a header but having an opponent (in this case, me) try and challenge them so that they experienced football specific scenarios.
Whilst not being able to participate in training we tried to ensure that the player maintained some form of cardiovascular fitness by completing watt bike and boxing sessions in the gym. Boldrini at the recent football medical conference suggested that conditioning work should start before beginning field based rehabilitation.
Once the player’s swelling was under control, their muscle bulks were back to baseline, and their knee to wall score was at a pre injury level then we started the player on return to running activities on the Alter-G machine (a great piece of kit that helps gradually increase tolerance to weight bearing through running), starting off at a small % with 50% and building up to around 80-85% (with the next progression being outside to continue rehabilitation) and progressing their duration so beginning with 1 min on/1 min off x 8 reps and building up to 4 mins on 1 min off x 4 reps.
With the playing having completed this and not reacting (significant stiffness or increased swelling or pain) then the player commenced their final stages of rehabilitation. This began return to running drills which involves the player completing a number of different activities such as marches, skips, jogging with accelerating and decelerating work progressing through to drills that worked on lateral aspects of function such as changes of direction and ball work and finally into agility and functional sessions. Once the player had successfully completed these all that was required for the player to return to training was complete their fitness sessions. Depending how long they had been out dictated how many runs the player was put through before returning to training, in this case the player went through five sessions.
Having completed his rehabilitation the player was ready to return to training and build up confidence in football specific activities. The player’s first game back was ironically at the same place he suffered the syndesmosis injury so there was a huge psychological challenge to overcome as well as the physical aspect. The player came through both parts and has continued to progress his return to pre injury levels.
Summary
In summary injuries to the ankle syndesmosis are quite uncommon but can cause a prolonged period of time out. Players can expect to return to playing within at least a couple of months depending on whether an operation or conservative management is carried out. There are also a number of factors that should be considered before a player returns to full participation to help reduce the risk of any further complications down the line.
Many thanks for reading this article. It would be great to hear your thoughts and any feedback you may have.
This blog was originally posted on Adam Meakin’s website. Learn more from Adam HERE.
Want to get better at treating ankle sprains?
Chris Bleakley has done a Masterclass lecture series for us on:
“Ankle sprain: etiology, diagnosis and rehabilitation”
Try it for FREE now with our 7-day trial!

References
Don’t forget to share this blog!
Related blogs
View allElevate Your Physio Knowledge Every Month!
Get free blogs, infographics, research reviews, podcasts & more.
By entering your email, you agree to receive emails from Physio Network who will send emails according to their privacy policy.
Leave a comment
If you have a question, suggestion or a link to some related research, share below!